Are you tired of your pictures looking dull and amateurish? Have you ever wondered how some people manage to make their photos look so professional? Well, wonder no more! Photoshop is the answer to all your photography-related prayers. With the right tools and techniques, you can take any ordinary picture and turn it into a piece of art that looks like it was taken by a professional photographer. So if you’re ready to up your photography game and make your pictures stand out, keep reading because I’m about to share some invaluable tips on how to make a picture look professional in Photoshop.

Introduction to the topic of making a picture look professional in Photoshop
Introduction to the topic of making a picture look professional in Photoshop:
In today’s digital age, having high-quality and visually appealing images is essential for various professional purposes. Whether you are a photographer, a graphic designer, a marketer, or simply want to enhance your personal photos, knowing how to make a picture look professional in Photoshop can greatly elevate the overall look and impact of your visuals. This blog post aims to provide you with a step-by-step guide on achieving professional-looking images through the use of Photoshop techniques. From blending modes to adding blur and selectively painting back areas, we will cover various aspects of photo editing to help you create stunning visuals for portraits, landscapes, and other types of photos. So grab your mouse and get ready to unleash your creativity in Photoshop!

Importance of enhancing photos for professional purposes
Enhancing photos for professional purposes is an essential skill in today’s digital age. Whether you are a photographer, a graphic designer, or a social media manager, the visual quality of your images can greatly impact the overall professionalism of your work. By taking the time to enhance your photos in Photoshop, you can elevate their quality and make them stand out from the rest.
Here are some key reasons why enhancing photos is important for professional purposes:
– First impressions: A professionally edited photo immediately captures the viewer’s attention and leaves a lasting impression.
– Enhancing details: By using Photoshop, you can bring out the smallest details in your photos, making them more visually appealing and engaging.
– Consistency: Professional editing ensures a consistent look and feel across your images and helps build a recognizable brand identity.
– Correcting imperfections: Photoshop allows you to fix any flaws or imperfections in your photos, such as blemishes, distractions, or lighting issues.
– Making a statement: Professionally edited photos can convey a sense of professionalism, creativity, and attention to detail, reflecting positively on your work or brand.
In summary, enhancing photos in Photoshop is crucial for creating a professional and polished visual presence. It not only improves the overall quality of your images but also helps in establishing a strong brand identity and making a lasting impression on your audience.

A brief explanation of the different ways to approach photo editing in Photoshop
Photo editing in Photoshop offers a wide range of possibilities when it comes to enhancing the appearance of your pictures. There are several different approaches you can take when editing photos in Photoshop, each with its own unique benefits. Some of these approaches include:
1. Basic Adjustments: This involves making simple adjustments to the exposure, contrast, and color balance of the photo to improve its overall appearance.
2. Retouching: This involves removing imperfections, blemishes, or distractions from the image to create a more polished look.
3. Filters and Effects: Photoshop offers a variety of filters and effects that can be applied to photos, such as adding a vintage or cinematic look, creating a black-and-white image, or applying a specific artistic style.
4. Blending Modes: Photoshop has different blending modes that can be used to combine multiple layers or adjust the opacity of a layer, allowing you to create unique effects and enhance the overall composition of the photo.
5. Advanced Techniques: For those with more experience, advanced techniques such as frequency separation or high-end retouching can be used to achieve professional-grade results.
Each of these approaches has its own strengths and can be used depending on the specific photo and the desired outcome. It’s important to experiment with different techniques and find the ones that work best for your style and the type of photos you want to edit.

Overview of the Overlay and Soft Light blend modes
The Overlay and Soft Light blend modes greatly contribute to making a picture look professional in Photoshop.
– These blend modes allow for subtle adjustments to the lighting and saturation of an image, creating a more polished and balanced look.
– The Overlay blend mode intensifies the contrast and color of the photo, while the Soft Light blend mode softens the image and adds a gentle luminosity.
– Both options are highly versatile and can be applied to various types of photos, such as portraits, landscapes, and product shots.
– Experimenting with these blend modes can dramatically enhance the overall tone and mood of the picture, adding a professional touch to your editing.

The benefits of adding a blur to the photo
Adding a blur to a photo can greatly enhance its overall professional look and feel. Here are the key benefits of incorporating a blur effect in Photoshop:
1. Softens distractions: By blurring the background or certain elements in the photo, you can reduce distractions and draw the viewer’s attention to the main subject. This helps to create a more focused and visually pleasing composition.
2. Depth and dimension: Applying a blur can simulate depth of field, creating a sense of depth and dimension in the image. This technique is particularly effective in portrait photography, where a blurred background can make the subject stand out and appear more three-dimensional.
3. Emphasizes emotions: Blurring certain areas of a photo can evoke a sense of mystery or dreaminess, enhancing the emotional impact of the image. It can add a touch of artistry and create a visually captivating atmosphere.
4. Simplifies busy backgrounds: If your photo has a cluttered or busy background, adding a blur can help simplify and declutter the scene, making the subject of the photo pop. This is especially useful for product photography or in situations where you want to highlight a specific element.
Remember, adding a blur should be done in moderation and thoughtfully, based on the desired effect and the style of the photo. Experimentation is key to finding the perfect balance between clarity and blurred elements for a professional look.

Steps to Enhance a Photo in Photoshop
Step 1: Duplicate the background layer and change the blend mode
One effective way to make a picture look professional in Photoshop is by following a specific set of steps. The first step involves duplicating the background layer and changing the blend mode. This allows for a layer adjustment without affecting the original image. To duplicate the background layer, simply right-click on the layer in the Layers panel and select “Duplicate Layer.” Then, choose either the Overlay or Soft Light blend mode from the drop-down menu. The Overlay blend mode adds contrast and vividness to the photo, while the Soft Light blend mode creates a subtle softening effect. Experimenting with both options can help determine which blend mode works best for the specific image. This technique is particularly useful for portraits, landscapes, and other types of photos as it can enhance the overall professional look and feel.

Explanation of how to duplicate the background layer
When it comes to making a picture look professional in Photoshop, one important step is to duplicate the background layer. This allows you to work on a separate layer without compromising the original image. Here’s how you can do it:
1. Open your image in Photoshop.
2. In the Layers panel, you’ll see the background layer. Right-click on it and select “Duplicate Layer.”
3. A dialog box will appear, asking you to name the duplicated layer. You can simply leave it as the default name or give it a more descriptive one.
4. Click on “OK,” and you’ll now have two layers in the Layers panel – the background layer and the duplicated layer.
Duplicating the background layer gives you the flexibility to experiment with different edits and effects while preserving the original image. This way, you can easily compare the changes and revert back if needed.

Instructions on changing the blend mode to either Overlay or Soft Light
One of the key steps in making a picture look professional in Photoshop is changing the blend mode to either Overlay or Soft Light. This can significantly enhance the overall appearance of the image. To do this, follow these simple and user-friendly instructions:
1. Duplicate the background layer: Start by duplicating the background layer of your photo. This will allow you to make changes while preserving the original image.
2. Change the blend mode: Next, select the duplicated layer and change the blend mode to either Overlay or Soft Light. The Overlay blend mode enhances contrast and saturation, while the Soft Light blend mode adds a subtle, soft glow to the photo.
By experimenting with these blend modes, you can achieve different effects and find the one that best suits your desired outcome.

Step 2: Add a blur to the photo
In Step 2 of making a picture look professional in Photoshop, adding a blur can enhance the overall quality and create a polished look. By utilizing the Gaussian Blur filter, you can control the level of blur to achieve the desired effect. Here’s how to do it:
– Introduce the Gaussian Blur filter: Explain that this filter allows you to add a soft, out-of-focus effect to the photo.
– Find the appropriate amount of blur: Emphasize the importance of finding the right balance. Too much blur can make the image look unnatural, while too little may not have a noticeable effect.
– Provide instructions: Guide readers through the process of applying the Gaussian Blur filter to the photo in Photoshop.
– Use examples: Show before and after examples to showcase the impact of adding a blur. Include different types of photos, such as portraits or landscapes, to demonstrate its versatility.
– Mention other applications: Highlight that this technique can also be used to create depth, emphasize certain subjects, or add a dreamy atmosphere to photos.
– Encourage experimentation: Urge readers to practice and experiment with different amounts of blur to develop their own unique style and improve their photo editing skills.
Remember, adding a blur to your photos in a natural and subtle way can elevate their overall professionalism and visual appeal.

Introduction to the Gaussian Blur Filter
The Gaussian Blur filter in Photoshop is a powerful tool that can be used to add a professional touch to your photos. By applying a blur effect to certain areas of your image, you can create a sense of depth and focus, drawing the viewer’s attention to the most important elements of your composition. This technique works particularly well in portrait photography, where it can help to soften skin imperfections and create a more flattering look. Additionally, the Gaussian Blur filter can also be used in landscape photography to add a dreamy and ethereal atmosphere to your images. By experimenting with different levels of blur, you can achieve various artistic effects and enhance the overall quality of your photos.

Finding the appropriate amount of blur for the desired effect
When it comes to achieving a professional look for your photos in Photoshop, finding the appropriate amount of blur is crucial to achieving the desired effect. Different photos and situations may call for different levels of blur. Here are a few tips to help you determine the perfect amount:
1. Experimentation is key: Every photo is unique, so it’s important to experiment with different levels of blur to find the one that enhances your photo while maintaining a natural look.
2. Start with a low blur setting: It’s always best to start with a low blur setting and gradually increase it until you achieve the desired effect. This allows you to maintain control over the final result.
3. Consider the subject and background: The amount of blur should be determined by the subject and the background of the photo. For portraits, a softer blur can be more appealing, while landscapes may benefit from a higher level of blur to create depth and a sense of distance.
4. Keep it subtle: Unless you’re intentionally going for a heavily blurred effect, it’s generally best to keep the blur subtle. The goal is to enhance the photo and create a professional look, not to overpower the image.
By following these simple tips and experimenting with different levels of blur, you can achieve a professional look in your photos that will impress viewers and elevate your photography skills.

Step 3: Paint back selected areas
In C. Step 3 of making a picture look professional in Photoshop, you’ll learn how to bring back clarity to selected areas of the image. This technique is particularly useful when you want to enhance specific details, such as the eyes and lips in a portrait. To achieve this, you’ll start by creating a layer mask, which will allow you to selectively apply the desired adjustments. Using a soft brush and painting with black, you can gradually reveal the areas where you want to bring back clarity. This technique can also be applied to other types of photos, including landscapes, by focusing on highlighting specific elements. By experimenting with this technique, you can truly bring your photos to life and create a more professional and polished look.

Creating a layer mask
Creating a layer mask in Photoshop is a powerful technique that allows for precise editing and control over specific areas of an image. By using a layer mask, you can paint on or off certain parts of the photo without permanently altering the original image. This technique is particularly useful when you want to bring back clarity in selected areas such as the eyes and lips in a portrait or specific details in a landscape.
To create a layer mask, follow these steps:
1. Select the layer you want to add a mask to.
2. Click on the “Add Layer Mask” button at the bottom of the Layers panel.
3. You will see a white thumbnail next to the layer thumbnail, indicating the layer mask.
4. Use a soft brush with the black color selected to paint on the mask where you want to hide parts of the image.
5. To reveal parts of the image again, switch to white color and paint on the mask.
By using layer masks, you can easily refine and enhance your photos in a natural and non-destructive way, giving you more control over the final result. Experiment with different brush sizes and opacities to achieve the desired effect.

Using a soft brush and painting with black to bring back clarity in specific areas such as eyes and lips
Using a soft brush and painting with black is a brilliant technique that can bring back clarity to specific areas of your photo, such as the eyes and lips. By selectively painting with black on a layer mask, you can reveal the underlying layer and restore focus and detail to these important features. Here’s how you can achieve this natural-looking enhancement in Photoshop:
1. Create a layer mask: After duplicating the background layer, add a layer mask to it by clicking on the Layer Mask icon at the bottom of the Layers panel. This will allow you to selectively paint on the mask without affecting the original layer.
2. Choose a soft brush: Select a soft-edged brush from the Brush tool options. Adjust the size and opacity according to the area you want to retouch. A larger brush is suitable for broader areas, while a smaller brush is ideal for fine details.
3. Paint with black: Make sure the foreground color is set to black, as this allows you to hide the areas you paint. Start brushing over the eyes and lips, gradually revealing the underlying layer and bringing back clarity. Use gentle strokes and build up the effect gradually for a more natural result.
Remember to take your time and zoom in to work on finer details. This technique can be applied to various types of photos, including portraits, landscapes, and still life, to enhance specific areas and create professional-looking results. Don’t hesitate to experiment and practice with different brush sizes and opacity levels to achieve the desired effect.
Using a soft brush and painting with black is just one of the many ways you can improve your photos in Photoshop. By learning and exploring different editing techniques, you can take your photography skills to new heights. Whether you’re a beginner or an experienced user, practising with Photoshop and experimenting with various tools and features will help you develop your own unique style and create stunning, professional-looking images.

Applying the Technique to Different Types of Photos
Explanation of how the technique can be applied to portraits, landscapes, and other types of photos
The technique discussed in this blog post can be applied to various types of photos, including portraits, landscapes, and other subjects. When it comes to portraits, adding a blur and using the soft brush technique can help enhance the clarity of the subject’s features, such as the eyes and lips. This can create a more polished and professional look. For landscapes, the technique can be used to enhance depth and create a visually appealing effect by selectively blurring certain areas. The same approach can be applied to other types of photos, such as still life or architecture shots, to emphasize certain elements and create a more professional and visually striking composition. The flexibility of this technique makes it suitable for a wide range of photography genres.

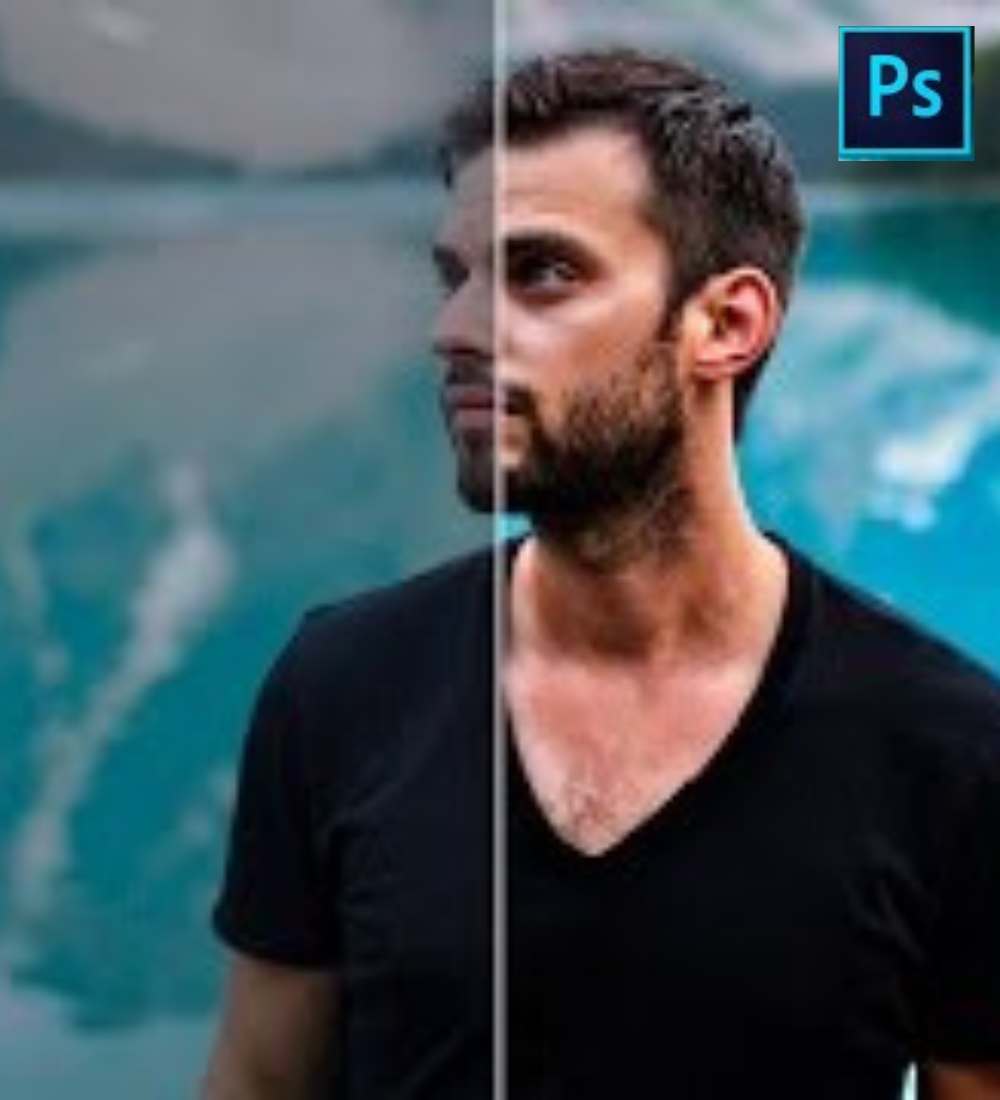
Examples showcasing the before and after effects of the technique
In order to fully understand the impact of the technique discussed in this blog post, let’s take a look at some examples showcasing the before and after effects. These examples will highlight how applying the steps outlined can elevate the quality of photos and give them a more professional look.
Example 1:
– Before: A landscape photo with dull colors and lack of definition.
– After: The colors are vibrant and well-balanced, with enhanced details in the foreground and background.
Example 2:
– Before: A portrait with uneven skin tones and distracting background elements.
– After: The skin tones are smooth and even, with a blurred background that makes the subject stand out prominently.
Example 3:
– Before: An image with harsh lighting and strong shadows.
– After: The lighting is more balanced, resulting in a softer and more flattering appearance.
These examples serve as a visual representation of how utilizing the techniques discussed in this blog post can transform ordinary photos into professional-looking images. By practicing and experimenting with these methods in Photoshop, readers can enhance their photo editing skills and create stunning visuals.

Further Tips and Recommendations
Additional tips for enhancing photos in Photoshop
In addition to the techniques discussed, there are several other tips that can help enhance your photos in Photoshop. Here are a few suggestions to consider:
1. Use adjustment layers: Adjustment layers allow you to make non-destructive edits to your photos. Experiment with adjustments like Levels, Curves, and Hue/Saturation to fine-tune the color, contrast, and overall tone of your image.
2. Sharpen selectively: Rather than applying a blanket sharpening effect to your entire photo, use the Unsharp Mask or Smart Sharpen tools to selectively sharpen specific areas such as the subject’s eyes or details in a landscape.
3. Remove distractions: If your photo has distracting elements, use the Spot Healing Brush or the Clone Stamp tool to remove them. This will help draw the viewer’s attention to the main subject.
4. Experiment with filters: Photoshop offers a wide range of artistic filters that can add unique effects to your photos. Try experimenting with options like Oil Paint, Watercolor, or Film Grain to give your images a creative touch.
5. Utilize adjustment brushes: If you want to make localized edits to specific parts of your photo, use adjustment brushes. These brushes allow you to selectively adjust exposure, saturation, or other settings to specific areas of your image.
6. Use presets and actions: Photoshop allows you to save and apply custom presets and actions, which can significantly speed up your workflow. Explore the preset libraries available or create your own to apply consistent adjustments to multiple photos.
Remember, enhancing photos in Photoshop is a creative process, so don’t be afraid to experiment and try different techniques. The more you practice, the better you’ll become at achieving professional-looking results.

Recommended resources for learning more about Photoshop techniques and tools
There are several recommended resources available for those who want to learn more about Photoshop techniques and tools. Here are some suggestions:
1. Online Tutorials: Websites like Adobe’s official Photoshop tutorials, YouTube, and other online learning platforms offer a wide range of tutorials for beginners and advanced users.
2. Photoshop Books: There are numerous books available that delve deeper into specific topics and provide step-by-step instructions. Some popular ones include “Adobe Photoshop Classroom in a Book” and “Photoshop CC For Dummies.”
3. Online Communities: Joining forums and communities dedicated to Photoshop can provide valuable insights and tips from experienced users. Websites like Photoshop Guru and Adobe Community can be great resources.
4. Adobe Help Center: Adobe’s Help Center provides comprehensive documentation, tutorials, and troubleshooting guides for Photoshop. It’s a reliable source for understanding the software’s features and functionalities.
5. Photoshop Courses: Enrolling in structured online courses or attending workshops can provide a more in-depth understanding of Photoshop. Platforms like Udemy and LinkedIn Learning offer a variety of courses suitable for different skill levels.
Remember, the key to mastering Photoshop is practice. Experimenting with different techniques and tools will ultimately enhance your photo editing skills.

Recap of the key points discussed in the blog post
Recap of the key points discussed in the blog post:
– Enhancing photos is essential for professional purposes as it helps to elevate the quality and impact of the image.
– Different approaches to photo editing in Photoshop can be used, such as utilizing blend modes and adding a blur effect.
– Overlay and Soft Light blend modes can bring out the colors and details in the photo, enhancing its overall appearance.
– Adding a blur to the photo using the Gaussian Blur filter can create a soft and polished look.
– Painting back selected areas using layer masks and a soft brush with black can bring back clarity in specific areas.
– This technique can be applied to various types of photos, including portraits and landscapes.
– Examples showcasing the before and after effects of the technique demonstrate its effectiveness.
– Additional tips for enhancing photos in Photoshop were provided throughout the blog post.
– Readers are encouraged to practice and experiment with Photoshop to improve their photo editing skills.
– Recommended resources were provided for further learning on Photoshop techniques and tools.
Overall, this blog post provides a comprehensive guide on how to make a picture look professional in Photoshop, offering step-by-step instructions, tips, and examples for readers to enhance their photo editing skills.