Images post-production involves the editing and enhancement of images to enhance their visual appeal and improve their quality. This process includes tasks such as cropping, adjusting brightness and contrast, removing blemishes, and adding filters or effects.
Effective image post-production can greatly enhance the overall aesthetic of photographs and make them more engaging and appealing to viewers. Whether you are a photographer, an e-commerce business owner, or a social media influencer, investing in professional post-production services can make a significant difference in the visual impact of your images.
By outsourcing post-production tasks, you can save time and ensure that your images are of the highest quality, ready to be shared or used for marketing purposes.

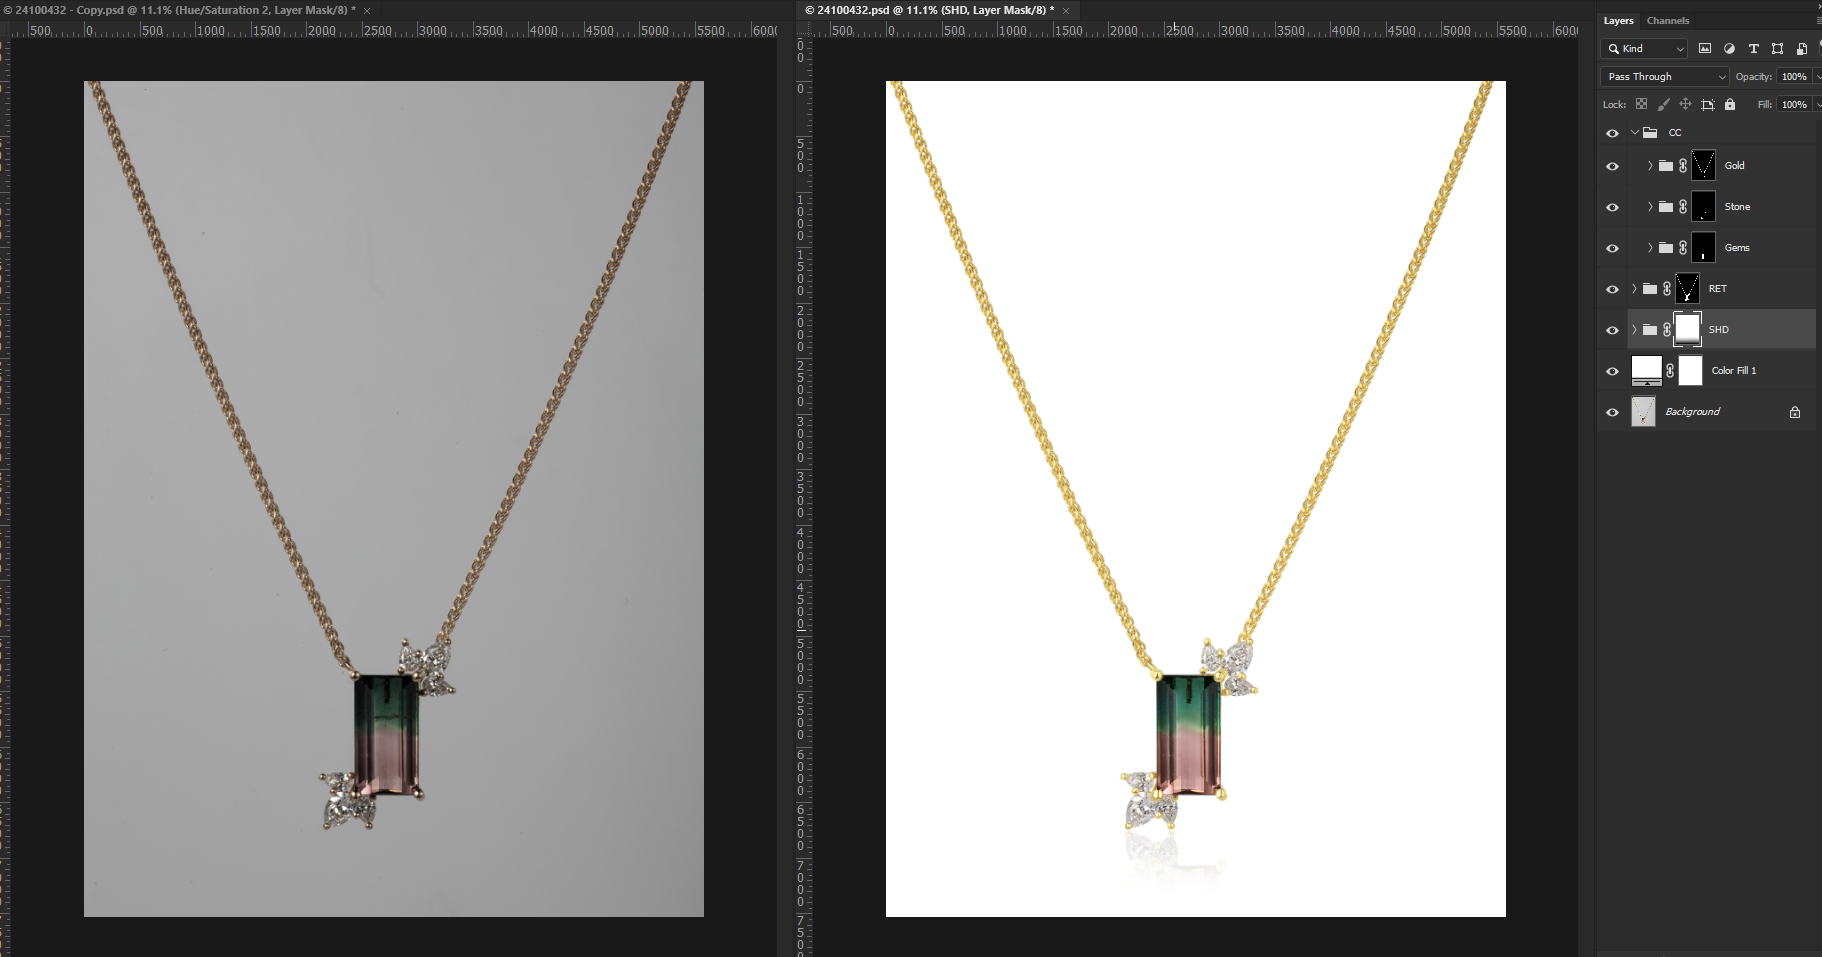
Credit: www.henninger.com
Why Images Post-Production Matters For Photographers
Enhancing The Aesthetic Appeal Of Photos
When it comes to photography, capturing the perfect shot is just the first step. Images post-production plays a crucial role in taking a photograph from good to stunning. By employing various techniques, photographers can enhance the aesthetic appeal of their photos and create truly captivating visuals.
Let’s explore why images post-production matters for photographers.
Creating Professional-Looking Images Post-Production Delivers Stunning Visuals
- Color correction and adjustment: Post-production allows photographers to fine-tune the colors in their images, ensuring accurate representation and enhancing the overall mood. Whether it’s adjusting white balance, saturation, or contrast, these tweaks bring out the true essence of a photograph, making it visually striking.
- Retouching and blemish removal: Even the most skilled photographers may encounter imperfections in their shots. Post-production provides the opportunity to meticulously remove blemishes, distractions, or unwanted elements, resulting in clean and professional-looking images.
- Image sharpening: Sharpening an image during post-production adds crispness and detail, making the subject pop and creating a sense of depth. This technique can be particularly useful when capturing landscapes or portraits, as it accentuates the finer details, such as textures or facial features.
- Creative editing and manipulation: Post-production offers endless possibilities for creative editing and manipulation. From applying artistic filters and effects to compositing multiple images, photographers can unleash their imagination and turn ordinary shots into extraordinary works of art.
Streamlining Workflow And Saving Time
- Batch processing: When photographers have hundreds or even thousands of images to edit, post-production tools enable them to apply consistent adjustments to multiple files simultaneously, streamlining the editing process and saving valuable time.
- Automated editing: With the help of presets and actions, photographers can automate repetitive editing tasks. By creating presets tailored to specific shooting conditions or desired effects, they can speed up the editing workflow and maintain consistency across their work.
- Efficient organization and cataloging: Post-production software often includes powerful organization and cataloging features. Photographers can easily sort, keyword, and search their image libraries, making it effortless to locate specific files in the future.
Images post-production is an indispensable part of a photographer’s toolkit. By enhancing the aesthetic appeal of photos and delivering stunning visuals, it allows photographers to showcase their creativity and stand out among the competition. Additionally, by streamlining the workflow and saving time, post-production ensures that photographers can focus more on capturing breathtaking moments and less on tedious editing tasks.
So, next time you capture a remarkable photo, remember that the journey doesn’t end there – post-production is where the magic happens.
The Art Of Image Retouching
Retouching images is not just about smoothing out blemishes or adjusting exposure; it’s a true art form that requires a combination of technical skill and creative vision. The goal of image retouching is to enhance the overall aesthetics of a photo while maintaining a sense of realism.
In this section, we will delve into the principles, tools, and techniques that make image retouching an essential part of post-production.
Principles Of Image Retouching
Image retouching involves several principles that guide the process and ensure the final result is visually appealing. Here are the key principles to keep in mind:
- Clarity and detail: Retouching should enhance the clarity and detail of an image without sacrificing its natural look. By selectively enhancing textures and sharpening important elements, you can bring out the fine details that might have been lost in the original photo.
- Color and tone: Proper color correction and tonal adjustments play a crucial role in image retouching. Balancing color saturation, adjusting highlights and shadows, and fine-tuning the overall tonality can significantly improve the visual impact of an image.
- Composition and balance: Image retouching also involves considering the composition and balance of elements within the frame. By removing distractions or unwanted elements, you can draw the viewer’s attention to the main subject and create a more visually pleasing composition.
- Realism and artistry: Achieving the right balance between realism and artistry is a fundamental aspect of image retouching. While it’s important to enhance the image, it should still retain a sense of authenticity. Striking this delicate balance allows the image to appear natural and believable while showcasing the photographer’s artistic vision.
Essential Tools And Techniques
To achieve professional-quality results, image retouching relies on a range of tools and techniques. Here are some essential tools and techniques commonly used in the process:
- Clone stamp tool: The clone stamp tool is used to remove unwanted objects or flaws by sampling a nearby area and replacing the unwanted pixels seamlessly.
- Healing brush tool: This tool is ideal for seamlessly blending imperfections by taking into account the texture and color of the surrounding area.
- Dodging and burning: Dodging involves selectively lightening areas, while burning focuses on darkening specific parts of an image. These techniques help create more balanced lighting and depth.
- Adjustment layers: Adjustment layers offer non-destructive editing capabilities, allowing you to fine-tune various aspects such as color, contrast, and saturation without permanently altering the original image.
- Sharpening: Sharpening tools help enhance the overall crispness and detail of the image, making it appear more visually striking.
- Masking: Masking techniques enable precise editing by selectively applying adjustments or effects to specific areas of the image, maintaining control over the retouching process.
Balancing Realism And Artistry
Achieving a balance between realism and artistry is at the core of professional image retouching. It’s important to enhance the image creatively while keeping it true to the original scene. Here are a few tips to strike that balance:
- Use subtle adjustments: Avoid overusing filters or extreme adjustments that can make the image appear unnatural. Subtle enhancements often yield more realistic and visually pleasing results.
- Pay attention to skin retouching: When working with portraits, ensure that skin retouching maintains a natural texture and doesn’t look excessively airbrushed or plastic.
- Preserve details: Retouching should enhance the details, not eliminate them. Maintain the integrity of important elements, such as facial features or intricate patterns, while fine-tuning the overall aesthetics.
- Follow the photographer’s vision: Retouching should align with the photographer’s artistic vision and the intended mood of the image. Understand the goals and preferences of the photographer to accurately convey their intended message.
Image retouching is a skill that requires both technical expertise and artistic flair. By understanding the principles, utilizing the essential tools and techniques, and finding the right balance between realism and artistry, you can transform ordinary photos into extraordinary works of art.
Mastering Color Correction In Post-Production
Color correction is a crucial part of the post-production process as it allows you to enhance the colors in your images and achieve the desired look and feel. Whether you’re a photographer, videographer, or graphic designer, understanding how to master color correction can greatly improve the quality and impact of your visuals.
In this section, we will delve into the key aspects of color correction, including understanding color theory, enhancing color balance and accuracy, and achieving creative color grading effects.
Understanding Color Theory
To effectively manipulate and correct colors in post-production, it’s essential to have a solid understanding of color theory. Here are some key points to keep in mind:
- Colors are often categorized into primary (red, blue, and green) and secondary (orange, purple, and yellow) colors.
- The color wheel is a visual representation of how colors relate to each other. It helps to grasp concepts like complementary colors (opposite on the color wheel) and analogous colors (adjacent on the color wheel).
- Understanding color temperature is vital. Warm colors (reds, oranges, and yellows) create a cozy and inviting atmosphere, while cool colors (blues and greens) evoke a sense of calmness.
- Color harmony ensures that the colors in an image work well together, creating a visually pleasing composition. It can be achieved through complementary or analogous color schemes.
Enhancing Color Balance And Accuracy
Color balance refers to the distribution of colors in an image, while color accuracy involves ensuring that the colors depicted are true to life. Here are some techniques to enhance color balance and accuracy in post-production:
- Adjusting white balance: Correcting the white balance ensures that whites appear neutral, which sets the tone for the rest of the colors in the image.
- Using color correction tools: Software applications like adobe photoshop and lightroom offer a wide range of tools and adjustments to refine color balance. These include sliders for adjusting hue, saturation, and luminance.
- Utilizing color calibration techniques: Monitor calibration tools and color charts can help in achieving accurate and consistent color representation across different devices.
- Performing selective color adjustments: Targeting specific colors in an image allows you to make subtle or drastic changes, enhancing the overall color balance and accuracy.
Achieving Creative Color Grading Effects
Color grading offers endless possibilities for enhancing the mood, atmosphere, and storytelling in your visuals. Here are some techniques to achieve creative color grading effects:
- Creating a cinematic look: Adjusting the color tones to resemble those found in movies can instantly elevate the visual impact. This includes enhancing blues and oranges, adding cinematic filters, or simulating film effects.
- Emphasizing a particular mood: Different colors evoke different emotions, so leveraging color grading can help amplify the intended mood. For example, warm tones may elicit feelings of happiness and nostalgia, while desaturated colors can create a somber or melancholic atmosphere.
- Adding color contrasts: By contrasting colors in specific areas of an image, you can draw attention to important elements or create visual interest.
- Experimenting with color combinations: Don’t be afraid to try unconventional color combinations to achieve unique and eye-catching effects. This can involve exploring complementary or triadic color schemes, or even introducing selective color pops.
Mastering color correction in post-production allows you to have full control over the visual impact of your images. By understanding color theory, enhancing color balance and accuracy, and exploring creative color grading effects, you can take your visuals to the next level, making them more engaging, impactful, and compelling.
Creating Visual Impact With Exposure And Contrast Adjustments
Balancing Highlights And Shadows
When it comes to creating visual impact in your images, exposure and contrast adjustments play a crucial role. By balancing highlights and shadows, you can transform your photos into stunning visuals. Here are some key points to consider:
- Understanding exposure: Proper exposure is essential for creating well-balanced images. It involves finding the right combination of aperture, shutter speed, and iso to capture the right amount of light. When adjusting exposure, keep in mind the following:
- Increase exposure to brighten your image and reveal more details in darker areas.
- Decrease exposure to darken the image and prevent overexposure in highlights.
- Use exposure bracketing techniques to capture multiple exposures and blend them together for a more balanced result.
- Controlling contrast: Contrast refers to the difference between the brightest and darkest areas of an image. It helps to create depth and define the subject. Here are some tips on adjusting contrast effectively:
- Increase contrast to make your image appear more vibrant and impactful.
- Decrease contrast for a softer and more subtle look.
- Utilize the tone curve adjustment tool to fine-tune the contrast by manipulating highlights, midtones, and shadows individually.
- Highlight recovery: Highlights are the brightest areas in an image, and sometimes they can get blown out or lose detail. To recover highlights, you can:
- Decrease the exposure or highlights sliders to bring back the lost details.
- Use a graduated filter or adjustment brush to selectively recover highlights in specific areas.
- Shadow enhancement: Shadows add depth and dimension to your images. Enhancing shadows can bring out hidden details and create a more visually appealing result. Try the following techniques:
- Increase the shadow slider to reveal more details in darker areas.
- Utilize the adjustment brush to selectively brighten specific shadows.
Transform Your Photos Today! Post-Production Techniques For Stunning Visuals
Creating visual impact with exposure and contrast adjustments is an essential part of post-production. By balancing highlights and shadows, you can enhance the overall look and feel of your images. Experiment with different adjustments and techniques to create stunning visuals that capture the attention of viewers.
Strategies For Effective Composition And Cropping
Images are a powerful tool for storytelling and capturing the attention of your audience. Once you have captured the perfect shot, the real magic happens during post-production. In this section, we will explore strategies for effective composition and cropping that will enhance your visuals and bring your images to life.
Rule Of Thirds And Other Composition Techniques
The composition of your image plays a vital role in creating a compelling visual experience. Here are some key points to consider when applying composition techniques:
- Rule of thirds: One of the most common and effective composition techniques is the rule of thirds. Imagine breaking your image into a grid with two evenly spaced horizontal lines and two vertical lines. The key elements of your image, such as the subject or points of interest, should be placed along these lines or at their intersections. This helps create a balanced and visually pleasing composition.
- Leading lines: Utilizing leading lines can guide the viewer’s eye through your image and create a sense of depth. These lines can be straight or curved and can be found in various elements such as roads, rivers, fences, or even the arrangement of objects. Consider positioning these lines in a way that draws the viewer’s attention towards the main subject or point of interest.
- Frames and framing: Another effective technique for composition is framing. By using elements within the image to create a frame around the subject, you can guide the viewer’s focus and add depth to the composition. Frames can be natural, such as a window or doorway, or created through the positioning of objects within the scene. Experiment with different framing techniques to add visual interest and context to your images.
- Symmetry and patterns: Symmetry and patterns can create a sense of harmony and balance in your compositions. Look for repetitive elements or reflections that can be used to create visually striking and impactful images. The human eye is naturally drawn to symmetry and patterns, making it a powerful composition technique to incorporate into your post-production process.
- Negative space: Don’t underestimate the power of negative space in your compositions. Negative space refers to the empty or blank areas in an image that surrounds the main subject. By purposefully incorporating negative space, you can draw the viewer’s attention to the subject and create a sense of simplicity and minimalism.
- Cropping: Cropping is a powerful tool in post-production that allows you to refine and enhance your composition. Whether you want to eliminate distracting elements, emphasize a particular subject, or create a more balanced composition, cropping can be used to fine-tune your images. Experiment with different crop ratios and perspectives to achieve the desired visual impact.
Remember, composition and cropping are subjective, and there are no hard and fast rules. Use these techniques as guidelines, but feel free to explore and experiment to find your unique style and visual storytelling approach. By applying these strategies for effective composition and cropping, you can take your images from good to stunning, ensuring that they captivate and engage your audience.
Advanced Techniques For Image Manipulation
Image manipulation is a powerful tool that enables photographers and designers to enhance their images, bring their creative visions to life, and tell compelling visual stories. In this section, we will explore some advanced techniques for image manipulation that will take your post-production skills to the next level.
From removing unwanted elements to compositing and creating photorealistic scenes, we will delve into the art of manipulating images. We will also discuss ethical considerations that should be kept in mind when altering photographs.
Removing Unwanted Elements
When it comes to image manipulation, one of the most common tasks is removing unwanted elements from a photograph. Whether it’s a distracting object in the background or an imperfection on a model’s skin, here are some techniques to help you seamlessly remove such elements:
- Clone stamp tool: This tool allows you to sample pixels from one area of an image and clone them onto another. It is useful for removing small objects or blemishes.
- Content-aware fill: This powerful tool analyzes the surrounding pixels and fills the selected area with content that matches the background. It is handy for removing larger objects or complex textures.
- Healing brush tool: Similar to the clone stamp tool, the healing brush tool samples pixels from one area and blends them with the surrounding pixels. It is ideal for retouching skin and other textured areas.
Compositing And Creating Photorealistic Scenes
Compositing involves merging multiple images together to create a seamless final result. Whether you want to place your subject in a different environment or combine different elements to form a unique scene, here are some techniques to consider:
- Layer masks: Layer masks allow you to control the visibility of specific parts of an image. You can selectively reveal or hide portions of an image by painting on the layer mask with black or white.
- Blend modes: Blend modes alter how different layers interact with each other. Experiment with blend modes such as multiply, screen, overlay, and color dodge to achieve different blending effects.
- Lighting and color adjustments: To make the composite image look more realistic, pay attention to the lighting and color adjustments. Match the lighting direction, intensity, and color temperature of the different elements for a cohesive and convincing final result.
Ethical Considerations In Image Manipulation
While image manipulation offers endless creative possibilities, it is essential to consider the ethical implications involved. Here are some ethical considerations to keep in mind:
- Accuracy and truthfulness: Image manipulation should not be used to deceive or mislead the viewer. It is important to be transparent about the alterations made to an image, especially in journalism and documentary photography.
- Respect for privacy: If you are working with photographs of individuals, obtain the necessary permissions before making any significant alterations that may impact their privacy or portray them inaccurately.
- Copyright infringement: Always respect copyright laws and ensure that you have the appropriate rights or permissions to use and manipulate images. Giving credit to the original creators is also important.
Advanced image manipulation techniques provide creative freedom and endless possibilities for photographers and designers. By mastering the art of removing unwanted elements, compositing images, and considering the ethical implications, you can elevate your post-production skills and create visually stunning and ethically sound images.
Remember to always stay true to your artistic vision while adhering to ethical standards.
Finalizing And Exporting Images For Different Platforms
Optimizing Image Formats And Sizes
When it comes to finalizing and exporting images for different platforms, optimizing image formats and sizes plays a crucial role. By following some post-production tips, you can ensure that your images are visually appealing and optimized for online visibility. Here are key points to keep in mind:
- Choose the right image format: Selecting the appropriate image format can significantly impact the loading speed and quality of your images. Consider the following options:
- Jpeg: Ideal for photographs and complex images with multiple colors and gradients.
- Png: Suitable for images with transparency or simple graphics.
- Svg: Best for logos, icons, and scalable graphics.
- Compress your images: Compressing your images reduces file size without compromising quality. Use tools like tinypng or kraken.io to compress your images efficiently.
- Resize images for different devices: To provide an optimal viewing experience across various devices, resize your images accordingly. Consider the following:
- Provide multiple versions of the same image in different sizes to accommodate various screen resolutions.
- Use responsive design techniques to ensure images adjust automatically based on the screen size.
- Add alt text for seo: Including alt text in your images helps improve their search engine optimization (seo) and accessibility. Ensure that alt text accurately describes the image content while incorporating relevant keywords.
- Utilize structured data: Implementing structured data markup, such as schema.org, can enhance image seo by providing search engines with additional information about your images, such as captions, credits, or image dimensions.
- Optimize image file names: Use descriptive and keyword-rich file names for your images. This practice helps search engines understand the image content and improves discoverability.
Seo-Friendly Images: Post-Production Tips For Better Online Visibility
Images are vital assets for engaging users and improving seo. Here are some post-production tips to ensure your images are seo-friendly:
- Optimize image file sizes: Large file sizes can impact website loading speeds, leading to a negative user experience. Compress your images to reduce file sizes without compromising quality.
- Use descriptive file names: Rename your image files to reflect their content and include relevant keywords. This practice helps search engines understand the image and boosts your chances of ranking well for relevant searches.
- Add descriptive captions and alt text: Captions and alt text provide context for both users and search engines. Craft descriptive captions that summarize the image content and include alt text that accurately describes the image using relevant keywords.
- Consider image sitemaps: Including images in your sitemap helps search engines discover and crawl them more efficiently. Create an image sitemap and submit it to search engines like google to improve the visibility of your images.
- Enable lazy loading: Implement lazy loading techniques to ensure that images are only loaded when they become visible on the user’s screen. This optimization technique improves page loading speeds and user experience.
Sharing Images On Social Media And Websites
Sharing images on social media and websites requires attention to detail to maximize their impact. Here’s what you need to know:
- Optimize image dimensions: Different social media platforms and websites have specific image dimension requirements. Ensure your images match the recommended sizes to avoid cropping or distortion.
- Use high-quality images: High-resolution and visually appealing images tend to capture more attention and engagement on social media platforms and websites.
- Customize image descriptions: Craft compelling descriptions for your images when sharing them on social media. Use relevant hashtags and keywords to increase their visibility.
- Utilize image metadata: Image metadata, such as exif data, provides additional information about your images. This data can be utilized by search engines and platforms to improve indexing and searchability.
- Leverage image sharing plugins: Use plugins or widgets that allow users to easily share your images on various social media platforms. This encourages engagement and widens the reach of your images.
Remember, optimizing image formats and sizes, creating seo-friendly images, and effectively sharing images on social media and websites can greatly enhance your online visibility and attract more audiences to your content.
Frequently Asked Questions On Images Post Production
How Does Post Production Enhance Images?
Post production enhances images by adjusting colors, contrast, and sharpness. It can also remove imperfections, improve composition, and add special effects. These edits make the image more visually appealing and professional-looking.
What Software Is Commonly Used For Post Production?
Commonly used software for post production includes adobe photoshop and lightroom, capture one, and skylum luminar. These programs offer a wide range of tools and features to optimize and enhance images, making them popular choices among photographers and graphic designers.
Can Post Production Fix Poor Lighting In Images?
Yes, post production can fix poor lighting in images. With editing techniques like adjusting exposure and shadows, enhancing highlights, and using selective editing tools, photographers can correct lighting issues and improve the overall quality and appearance of the image.
Conclusion
In a world driven by visual content, the importance of high-quality images cannot be overstated. Effective post-production techniques can elevate ordinary photos to their full potential, capturing the attention of viewers and driving engagement. By utilizing techniques like retouching, color grading, and cropping, photographers can enhance their images and create a cohesive visual story.
Additionally, optimizing images for seo can improve website visibility and increase traffic. With the right tools and knowledge, photographers can ensure their images are being found by search engines and users alike. As technology continues to advance, learning and adapting to new post-production techniques will be essential for photographers to stay relevant and competitive in the industry.
So, whether you are a professional photographer or an enthusiast, investing time in your post-production skills will undoubtedly yield rewarding results. Start exploring the exciting world of image post-production today and see your images shine like never before.