How to make a clipping path in Photoshop, use the pen tool to draw an outline around the desired object. Clipping paths are a powerful tool in Photoshop for isolating and removing backgrounds from images.

Whether you’re a graphic designer, photographer, or e-commerce business, knowing how to create a clipping path can greatly enhance your editing capabilities. By following a few simple steps, you can easily separate objects from their background and create clean, professional-looking images.
We will guide you through the process of making a clipping path in photoshop using the pen tool. Whether you’re a beginner or have some experience with photoshop, this tutorial will help you master this essential technique.
Introduction To Clipping Path
What Is A Clipping Path?
A clipping path is a powerful tool in photoshop that allows you to create a precise outline or path around an object. This path then becomes a boundary where anything outside is removed or made transparent, while everything inside remains intact.
It is commonly used for removing backgrounds, isolating objects, or creating unique shapes.
Key points:
- A clipping path is a digital outline or path around an object in photoshop.
- It acts as a boundary to selectively remove or isolate parts of an image.
- It is useful for removing backgrounds, isolating objects, or creating custom shapes.
- The path can be created using various techniques such as the pen tool or selection tools in photoshop.
Why Use Clipping Paths In Photoshop?
When working with complex images or product photography, using clipping paths in photoshop offers several benefits:
- Precise isolation: Clipping paths allow you to accurately isolate specific objects from their backgrounds, ensuring a clean and professional appearance.
- Background removal: By creating a clipping path around an object, you can effortlessly remove the background, making it transparent or replacing it with a new one.
- Retouching flexibility: With a clipping path, you can easily make modifications to the object within the path without affecting the surrounding area, providing more control and flexibility during editing.
- Consistent results: Using clipping paths ensures consistent results across different marketing materials, such as websites, catalogs, or advertisements.
- Enhanced creativity: Clipping paths give you the freedom to experiment with different compositions, create unique shapes, or combine multiple elements to produce visually stunning designs.
The Importance Of Precise And Accurate Clipping Paths
Creating precise and accurate clipping paths is crucial for achieving professional and high-quality results. Here’s why it matters:
- Seamless integration: Accurate clipping paths seamlessly integrate objects into various layouts, making them appear realistic and cohesive with the surrounding elements.
- Improved visual appeal: By isolating objects with precision, you can enhance their visual appeal and make them stand out.
- Better user experience: Well-executed clipping paths contribute to a positive user experience by presenting products or images in an uncluttered and focused manner.
- Brand consistency: Consistent and accurate clipping paths help maintain brand consistency across different platforms and marketing materials.
- Time and cost efficiency: When clipping paths are made accurately from the start, it saves time and effort compared to fixing inaccuracies later.
Remember, mastering the art of creating clipping paths in photoshop not only enhances your editing skills but also opens up exciting opportunities to unleash your creativity and produce stunning visuals. So, let’s dive into the process and explore the amazing world of clipping paths!
Understanding The Tools And Techniques
Overview Of The Pen Tool In Photoshop
When it comes to creating a clipping path in photoshop, the pen tool is an essential tool to master. It allows you to create precise paths and selections by utilizing anchor points and bezier curves. Understanding how to use this tool effectively will give you greater control over your images.
Here’s an overview of the pen tool and its key features:
- The pen tool can be found in the toolbar on the left side of the photoshop interface. It is represented by an icon that resembles a fountain pen.
- By clicking and dragging with the pen tool, you can create anchor points that define the shape of your path. These anchor points can be adjusted later to refine the path.
- Bezier curves can be created by manipulating the direction handles of the anchor points. This allows you to create smooth and flowing paths.
- The pen tool also has additional features such as the convert point tool and the add anchor point tool, which provide further control over your paths.
Step-By-Step Guide On Creating A Clipping Path With The Pen Tool
Creating a clipping path using the pen tool may seem daunting at first, but with a step-by-step approach, you can easily master this technique. Follow these instructions to create your own clipping path:
- Launch photoshop and open the image you want to work with.
- Select the pen tool from the toolbar on the left side of the interface.
- Zoom in on the area where you want to start your clipping path.
- Click on the edge of the object you want to clip to create your first anchor point.
- Continue clicking around the object, adding anchor points as necessary to define the path.
- To create curved segments, click and drag the direction handles of the anchor points.
- As you progress along the path, adjust the position and shape of the anchor points to precisely capture the object’s contours.
- To close the path, click on the first anchor point you created.
- Once the path is closed, right-click on the path and choose “make selection” from the context menu.
- Adjust the feather radius if you want a softer edge for your clipping path.
- Click “ok” to create the clipping path.
Utilizing Anchor Points And Bezier Curves For Precise Control
- Anchor points provide the foundation for your clipping path. They allow you to define the shape and size of the path and can be adjusted as needed.
- Bezier curves are essential for creating complex and organic shapes. By manipulating the direction handles, you can create smooth curves and sharp angles.
- The combination of anchor points and bezier curves gives you the ability to create precise clipping paths that accurately trace the edges of objects.
Remember, practice makes perfect. Experiment with different images and objects to refine your skills in using the pen tool. With time and practice, you’ll become more proficient in creating clipping paths that seamlessly isolate objects in your photos.
Tips And Tricks For Perfect Clipping Paths
Creating a clipping path in photoshop is an essential skill for anyone working with images and graphics. Whether you are designing a website, editing product photos, or creating digital artwork, knowing how to create precise and clean clipping paths can take your work to the next level.
In this section, we will explore some useful tips and tricks that can help you achieve perfect clipping paths in photoshop.
Using Guides And Grids For Alignment And Proportion:
- Guides and grids are valuable tools in photoshop that can assist you in aligning and proportioning your clipping paths accurately. Here are a few key points to keep in mind:
- Enable the grid by going to the “view” menu and selecting “show” and then “grid.” This will give you a visual reference to ensure that your clipping path is aligned properly.
- You can create guides by dragging from the rulers located at the top and left side of the photoshop canvas. These guides can assist you in aligning your clipping path precisely.
- Use the “snap” feature in photoshop to snap the anchor points of your path to the grid or guides, ensuring that your path follows a straight or perfectly curved line.
Adjusting Curves And Handles To Create Smooth Edges:
- Smooth edges are crucial for a clean and professional-looking clipping path. To achieve smooth edges, consider the following tips:
- Use the “direct selection tool” (a) to adjust the anchor points and handles of your path. By manipulating these points, you can create smooth curves and straight edges.
- Be mindful of the direction of the curve handles. The direction in which you drag the handles will determine the curvature of the path. Experiment with different handle positions to achieve the desired smoothness.
- Utilize the “convert point tool” (shift + c) to convert sharp corners into smooth curves. This tool allows you to adjust the direction of the control handles at anchor points, providing greater control over the shape of your clipping path.
How To Handle Complex Shapes And Objects:
- While simple shapes are relatively easy to clip, complex shapes and objects can pose a challenge. Here are some tips for handling complex shapes effectively:
- Break down complex objects into smaller, manageable sections. This approach allows you to focus on each section separately, ensuring greater precision and control.
- Utilize the “pen tool” (p) to create multiple paths for intricate objects. By segmenting the object into smaller components, you can achieve more accurate clipping paths with cleaner edges.
- Take advantage of the “path operations” feature in the “path” panel. Options such as combine, intersect, and exclude can help you refine and combine multiple paths to create the desired clipping path.
Remember, practice makes perfect when it comes to creating clipping paths in photoshop. Experiment with these tips and tricks to improve your skills and achieve precise and professional results. With time and experience, you’ll be able to tackle even the most complex clipping tasks with ease.
Refining And Fine-Tuning Clipping Paths
Creating a clipping path in photoshop is just the first step in isolating an object or subject from its background. To achieve a more polished and professional result, it’s important to refine and fine-tune the clipping path. In this section, we will explore some essential techniques for refining your clipping paths in photoshop.
Applying Feathering And Anti-Aliasing For Smooth Transitions:
- Feathering: Make use of the feathering feature in photoshop to create smooth transitions between the subject and the background. By applying a feather radius, you can soften the edges of the clipping path, resulting in a more natural and seamless blend.
- Anti-aliasing: Anti-aliasing is crucial for achieving smooth and jagged-free edges in your clipping paths. Enable anti-aliasing in the options bar when creating a selection, and photoshop will apply subtle shades of gray to the edges, ensuring a smoother transition.
Removing Unwanted Artifacts And Improving The Overall Quality:
- Zoom in for precision: To spot any unwanted artifacts or imperfections along the clipping path, zoom in to get a closer look. This will allow you to make more accurate adjustments and ensure a higher-quality result.
- Utilize the pen tool: The pen tool in photoshop provides unparalleled precision for adjusting your clipping path. Take advantage of the anchor points and control handles to achieve precise curves, straight lines, and smooth transitions.
- Clean up with the eraser tool: If there are any stray pixels or rough edges within the clipping path, the eraser tool can come in handy. Select a small brush size and gently erase any imperfections along the path to achieve a clean and polished result.
Understanding The Different Selection Options In Photoshop:
- Magic wand tool: The magic wand tool is useful for selecting areas with similar colors or tones. By adjusting the tolerance level, you can expand or contract the selection to include or exclude specific pixels.
- Quick selection tool: The quick selection tool allows you to paint over the subject or object you want to select. Photoshop will intelligently analyze the image and automatically expand the selection based on the edges it detects.
- Lasso tool: The lasso tool, whether it’s the standard, polygonal, or magnetic option, provides a more manual approach to creating selections. Use it to trace around the subject or object carefully, ensuring you capture all the necessary areas.
Remember, refining and fine-tuning your clipping paths in photoshop is essential for achieving professional and visually appealing results. By applying feathering and anti-aliasing, removing unwanted artifacts, and utilizing the different selection options available, you can take your clipping paths to the next level of precision and quality.
Advanced Techniques For Challenging Images
Creating clipping paths in photoshop can be relatively simple for straightforward subjects, but what about those challenging images with intricate details, transparent objects, or even subjects involving hair and fur? In this section, we will explore advanced techniques to overcome these difficulties and achieve professional-looking results in photoshop.
Creating Clipping Paths For Hair And Fur:
When dealing with images that feature hair or fur, creating a precise clipping path can be quite complex. Here are some key points to keep in mind:
- Utilize the pen tool: The pen tool is your best friend when it comes to creating accurate paths for detailed elements like hair and fur. Take the time to familiarize yourself with its functionality and practice tracing the outlines of individual strands or clusters.
- Zoom in for precision: Zooming in on the image allows you to work with finer details and achieve more accurate paths. Take advantage of this feature to navigate through the intricacies of the hair or fur.
- Refine the path using anchor points: Adjust the shape of the path by manipulating the anchor points. Add or delete points as needed to ensure a smooth and natural-looking clipping path.
- Utilize the refine edge feature: Photoshop provides a refine edge feature that can assist in refining the selection around hair or fur. Explore the options available, such as smart radius and feather, to achieve the desired result.
Dealing With Intricate Details And Transparent Objects:
In images with intricate details or transparent objects, creating a smooth and seamless clipping path requires careful attention. Consider the following:
- Expand your selection: Sometimes, the initial selection may not be sufficient to accurately capture intricate details or transparency. To expand the selection, use the select > modify > expand command, and adjust the pixel range until the desired areas are included.
- Feather the edges: Feathering the edges of a selection can help blend it seamlessly with the background. Experiment with different feathering levels to achieve a natural transition.
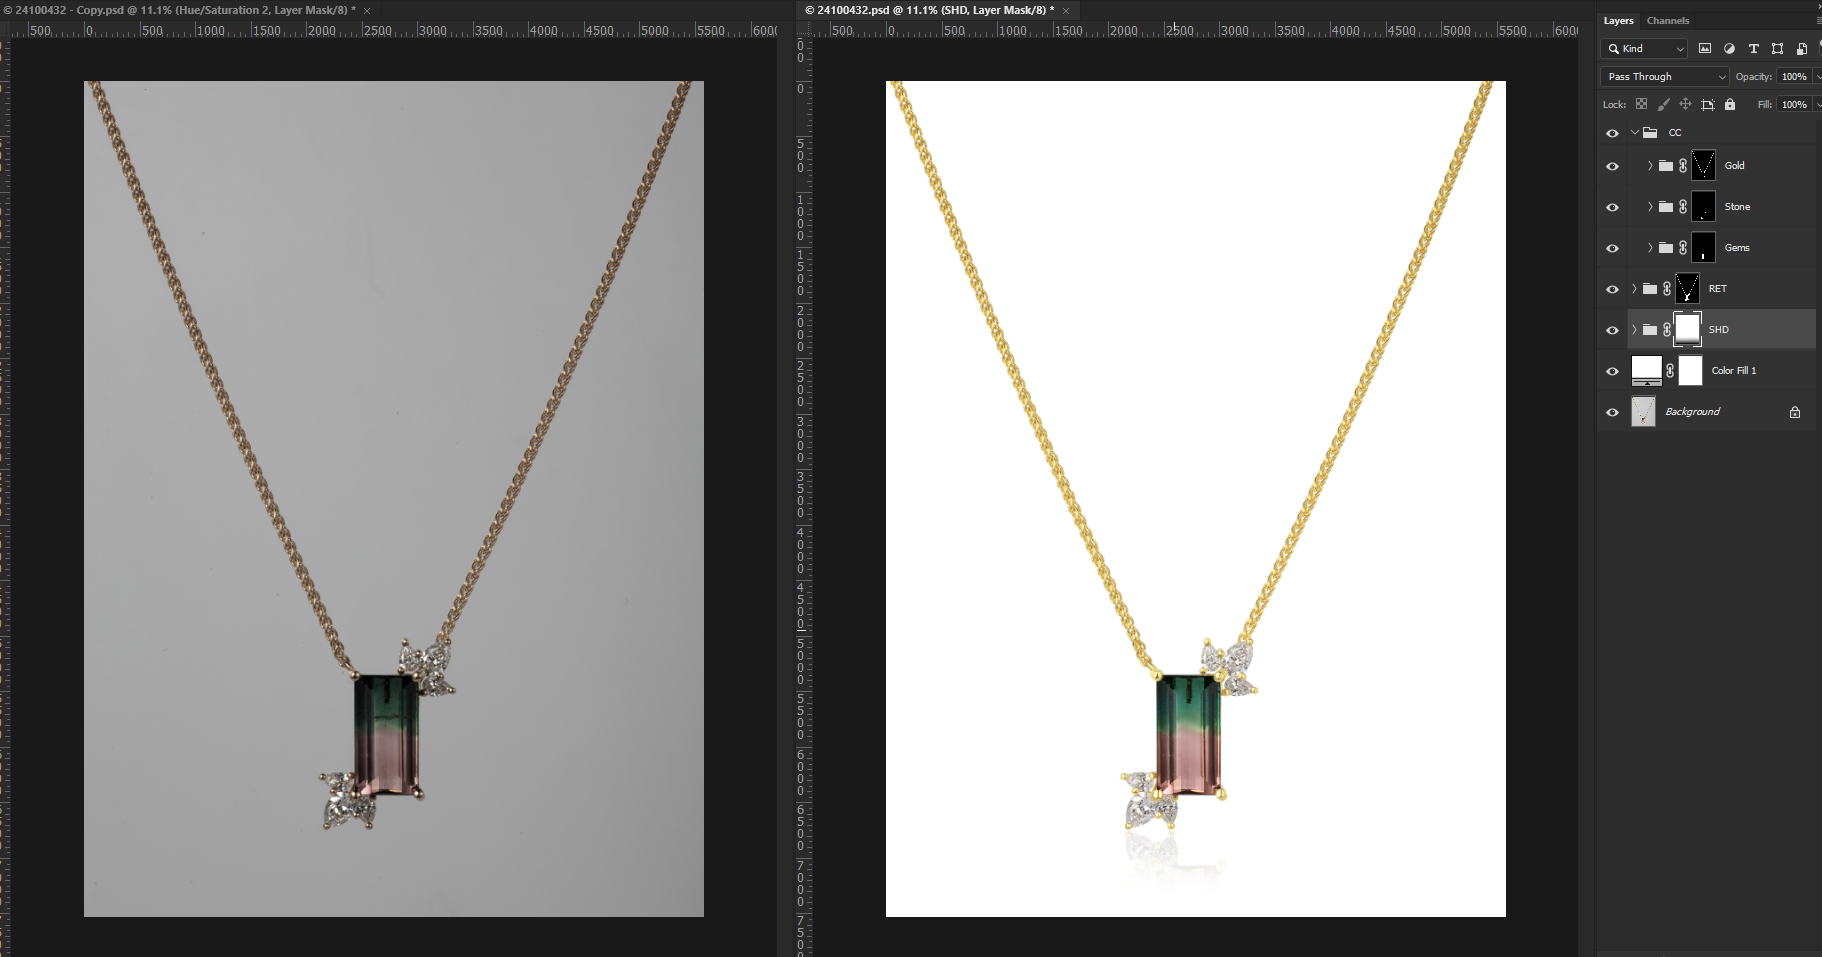
- Incorporate layer masks: Instead of solely relying on a clipping path, layer masks allow for further refinement and adjustment. They provide the flexibility to hide or reveal specific areas of the image, ensuring that intricate details are preserved.
Combining Multiple Paths For Complex Subjects:
For complex subjects that require multiple clipping paths, photoshop offers tools to combine these paths effectively. Consider the following tips:
- Utilize the paths panel: The paths panel in photoshop allows for the creation and management of multiple paths. Take advantage of this feature to keep track of different paths for different areas of the image.
- Combine paths using boolean operations: Photoshop provides boolean operations like union, intersection, subtract, and exclude to combine or subtract paths. Experiment with these operations to accurately create complex clipping paths.
- Use layer blending modes: When combining multiple paths, layer blending modes can help achieve a seamless integration of the subject with the background. Experiment with different blending modes to find the best result.
With these advanced techniques, tackling challenging images in photoshop becomes more manageable. Take your time, practice, and refine your skills, and soon you’ll be confidently handling even the most intricate design elements with precision and finesse.
Alternative Methods For Clipping Paths
When it comes to creating a clipping path in photoshop, using the pen tool is the most common method. However, there are alternative techniques that can be equally effective, and even save you time. In this section, we will explore some of these alternative methods to help you achieve professional-looking results.
Exploring Other Selection Tools In Photoshop
- Magic wand tool: This tool allows you to select areas with similar colors or tones. Simply click on the area you want to select, and adjust the tool’s tolerance to fine-tune the selection. As the magic wand tool is not as precise as the pen tool, it is best suited for images with well-defined edges.
- Quick selection tool: This tool is great for making selections based on color and texture. By dragging the tool over the desired area, photoshop will automatically detect and select similar areas. Refine your selection using the tool’s options, such as adding or subtracting from the selection.
- Lasso tool: With the lasso tool, you can manually draw around the object you want to select. It gives you more control for irregular shapes or objects with complex edges. Use the polygonal lasso tool or magnetic lasso tool for more specific selections.
Utilizing Layer Masks For Non-Destructive Editing
- Layer masks allow you to hide or reveal parts of a layer without permanently erasing any pixels. By applying a layer mask to your image, you can make precise adjustments and fine-tune your clipping path without affecting the original image.
- To create a layer mask, select the layer you want to mask and click on the layer mask icon at the bottom of the layers panel. Use a brush tool to paint on the layer mask with black to hide areas or white to reveal them. Adjust the opacity of the brush for more subtle masking.
Automatic Selection Techniques For Time-Saving
- Object selection tool: This tool uses ai technology to automatically detect and select objects in an image. Simply draw a rough selection around the object, and photoshop will refine it to include the edges of the object. This can be a huge time-saver, especially when dealing with complex or intricate objects.
- Select subject: This feature uses machine learning algorithms to identify the main subject of an image and create a selection around it. It works best on images with clearly defined subjects against a contrasting background. Simply go to the select menu and choose select subject.
While the pen tool remains the go-to method for creating clipping paths in photoshop, it’s always good to explore alternative techniques and tools. The magic wand tool, quick selection tool, and lasso tool provide different ways of making selections, while layer masks offer non-destructive editing options.
Additionally, the object selection tool and select subject feature can significantly speed up your workflow. With practice and experimentation, you’ll soon find the method that works best for your specific needs.
Importing And Exporting Clipping Paths
Creating a clipping path in photoshop allows you to create precise and clean cutouts of objects in your images. Once you have created a clipping path, the next step is to import and export it for various purposes such as incorporating it into your print and web design projects.
In this section, we will explore how to save and export clipping paths and troubleshoot common issues that arise during the exporting process.
Saving And Exporting Clipping Paths For Various Purposes:
- Saving a clipping path: After creating a clipping path, it is essential to save it to ensure that you can use it in the future. Follow these steps to save your clipping path:
- Select the ‘paths’ panel from the ‘window’ menu in photoshop.
- Right-click on the ‘work path’ and choose the ‘save path’ option.
- Name your path and save it.
- Exporting a clipping path for print design projects: When preparing a design for print, it is necessary to export the clipping path. Here’s how you can do it:
- Open the ‘paths’ panel and select the desired path.
- Go to the ‘file’ menu and choose ‘export’ > ‘paths to illustrator’.
- Save the file as an illustrator (.ai) format to maintain the quality and scalability of the clipping path.
- Exporting a clipping path for web design projects: Web design projects often require exporting clipping paths to ensure optimized file sizes. Follow these steps to export a clipping path for web design:
- Select the desired path in the ‘paths’ panel.
- Go to the ‘file’ menu and choose ‘export’ > ‘export as’.
- Select the desired file format, such as png or jpeg, and adjust the settings as per your requirements.
- Save the file to your desired location.
Incorporating Clipping Paths In Print And Web Design Projects:
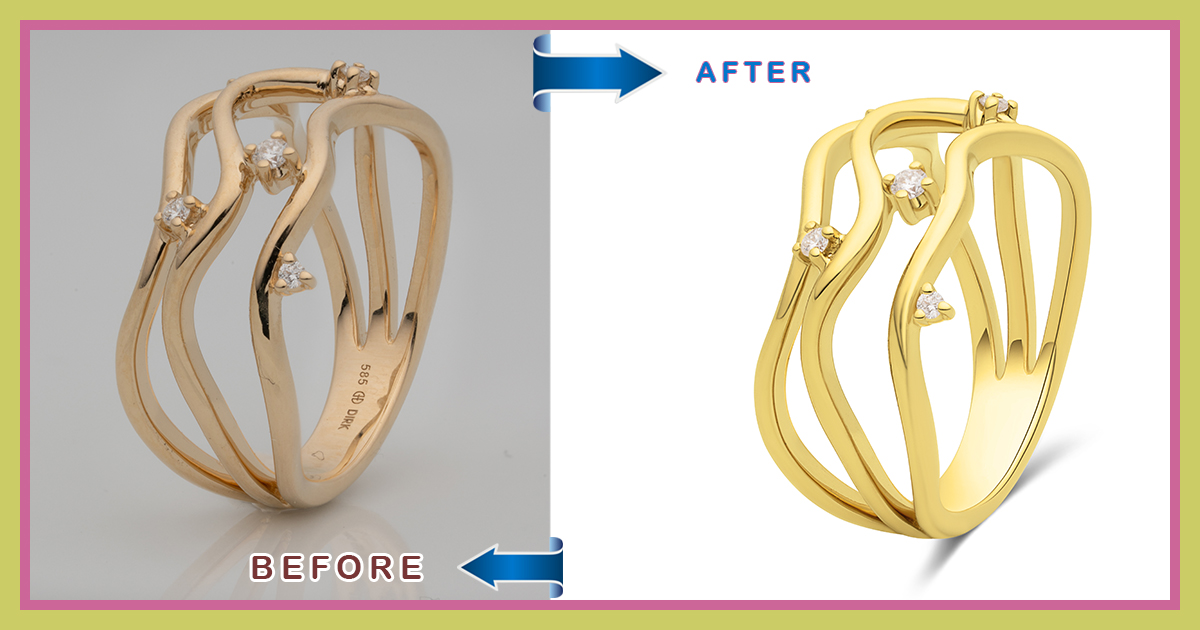
- Print design projects: Clipping paths are commonly used in print design to create clean and precise cutouts of images. By incorporating clipping paths, you can seamlessly blend the subject of an image with the design layout, making it visually appealing and professional.
- Web design projects: In web design, clipping paths are used to remove backgrounds or isolate specific parts of an image. This enables you to create unique and visually striking designs by placing images within custom shapes or creating interesting layout compositions.
Troubleshooting Common Issues During Exporting:
- Pixelated clipping paths: If your exported clipping path appears pixelated or low-quality, ensure that you are using the appropriate file format. Opt for formats like png or svg to maintain sharpness and clarity.
- Incorrect placement: Sometimes, after exporting a clipping path, you may notice that it is not properly positioned within your design. Double-check the dimensions and alignment of your design elements to ensure accurate placement.
- Missing clipping paths: In some cases, the exported file may not retain the clipping path you have created. To troubleshoot this issue, make sure that you have properly saved and exported the path. Additionally, confirm that the destination software or platform supports the specific file format and the inclusion of clipping paths.
By following these steps and troubleshooting common issues, you can effectively import and export clipping paths in photoshop for your print and web design projects. Remember to experiment and explore the various ways you can incorporate clipping paths to create stunning visuals.
Frequently Asked Questions Of How To Make A Clipping Path In Photoshop
How Do You Make A Clipping Path In Photoshop?
To make a clipping path in photoshop, use the pen tool to create a path around the object you want to clip. Then, right-click on the path and select “make selection. ” After that, go to the “paths” panel, click on “clipping path options,” and select the desired settings.
Finally, save your image in a format that supports transparency, such as png, to retain the clipping path.
Conclusion
To wrap up, creating a clipping path in photoshop is an essential skill for anyone working with images. Whether you are a photographer, graphic designer, or e-commerce business owner, knowing how to accurately extract objects from their backgrounds can greatly enhance your work.
By following the step-by-step process outlined in this blog post, you can achieve professional-looking results that are sure to impress. Remember to start with a high-resolution image, choose the right tool for the job, and carefully refine your selection for a precise outcome.
Additionally, keep in mind that practice makes perfect, so don’t be discouraged if it takes a few tries before you master the technique. With time and dedication, you’ll become proficient in creating clipping paths and opening up countless creative possibilities in your digital projects.
Happy editing!